4 ways to digitally restore old photos

There’s a lot of gold in your old family photo albums. It might be hard to believe at first when you look at those old black and white photos. They’re not nearly as vivid or eye-catching as digital pictures — but you can change that with a little editing magic!
Got a huge mountain of pictures to deal with? Tap or click here for steps to organize your messy photo collection. You may find some treasures lying inside an old, forgotten box.
Whether your images are faded, scratched or torn, they can all be fixed. That’s right: Even if the pictures look almost unrecognizable, you can restore them to their old glory. Follow these steps, and you can preserve old family photos for generations to come.
1. Crop out the bad
First, scan the photos so you’ve got them on your computer. Then, you’ll be able to crop them to create a world of difference.
This will help you later down the road when you’re printing images or even sharing them online. It’s also a great way to start to cut out problem areas. For example, married edges or unattractive vignette corners can distract from the focal point.
Cropping is a great way to train the eye to your subject. Whether you’re editing a portrait or an old home, you want the eye to focus on the star of the show — not the unattractive edges. Zooming in on the subject is a quick and easy fix.
Need help cropping and editing images without breaking the bank? Tap or click here for free Photoshop alternatives.
2. Adjust colors
Next, decide how you want the final image to look. If the original is that beautiful Sepia hue and you want black and white, add a B&W adjustment layer. If it’s B&W, but you want Sepia, add a photo filter effect.
You can even colorize a black and white image! Tap here for six ways to quickly enhance a photo.

Now add adjustment layers for Brightness and Contrast. Make sure also to adjust the overall exposure with a levels layer. This way, you won’t lose the photo’s detail or definition.
You can also use a Color Balance adjustment layer to tweak the shadows, mid-tones and highlights selectively. This preserves the picture’s luminosity as you go. After that, fine-tune with a Hue and Saturation layer.
3. Fix damaged areas
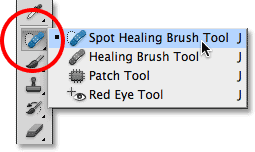
Removing small dust and marred spots can be done quickly with the Spot Heal tool. This tool’s location may change based on the photo editing software you use. Here’s what it looks like on Photoshop:

For large areas, like creases, try the Clone Stamp tool.
If large portions of an image are missing entirely, try selecting that portion and using the Content Aware Fill tool.
You can find all of these features on the vertical toolbar in Photoshop. Hover over each icon and you’ll see the name of each feature, which will help you while you’re editing.
You may need to use several of these tools, depending on how badly the underlying image was damaged. If you don’t have Photoshop and are using a different photo editor, look for similar tool options.
4. Adjust exposure levels
Finally, adjust the image areas that may be slightly over or underexposed by using the Dodge (to lighten) and Burn (to darken) tools on the offending spots.
Some photos will be easier to restore digitally than others, depending on the amount of damage they have endured over the years. But using these simple techniques can give old photos new life, bringing enjoyment to generations to come.
Hopefully, this inspires you to search through your old family albums! Now, you can revive anything you find, no matter how damaged it is.
Looking for pro photography shots or inspiration, tips and advice to drive your own photography goals? Check out Dreamstime for all the pro images and inspiration you need!
Tags: computer, cropping, family, family photos, old photos, photo albums, photo editing, photo editing software, photography
