Apple tip: How to record your phone screen

Have you ever tried to give someone instructions on using a feature on their phone, but they can’t figure it out? Learning new tricks can be incredibly frustrating, especially with technology evolving every few months. Want to navigate your computer easier? Tap or click here for handy keyboard shortcuts.
There is an easy way to walk someone through anything on your phone. Simply record your phone screen while doing the activities you are trying to explain. You can then send that video to your friends and family to help them along.
There are other reasons you’d want to record your screen as a video. Perhaps you want to share your recent Candy Crush progress with your friends, or you want to report a problem to Apple you can’t seem to fix. Whatever the reason, read on to find out how to record your iPhone screen.
How to record your iPhone screen
These instructions are valid for iOS 14 or later. If you have an older version of iOS, you’ll need to update it. Tap or click here for instructions on how to update your iPhone. In addition to staying current, new updates typically solve any previous bugs or issues you may be having.
Add Screen Recording to your control panel:
- Open Settings on your iPhone.
- Select Control Center.
- Scroll to the More Controls section.
- Press the green + sign next to the Screen Recording option. You’ve now added screen recording to your basic control panel options.

Starting a recording:
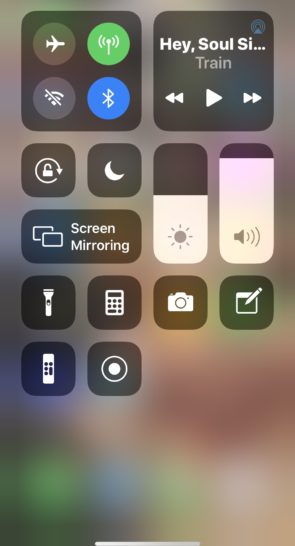
- To access your control panel quick menu, swipe down from the right side of your screen.
- Control Center will now open.
- Touch and hold the grey circle that looks like a recording button.

- You’ll then press the turn microphone on button at the center bottom of the screen. (NOTE: If you don’t do this, your video won’t have audio).
- Tap the recording button again and you’ll get a three-second count down to when the video will begin.
- When you are done recording, you have two options to stop your recording.
- You can tap on the red highlighted time stamp on the left top corner of your screen and select it.
- A pop-up window will appear asking you if you want to stop screen recording, choose stop.

Your second option is to open Control Center again and tap the red record button. This will stop your video. Now you can go to the Photos app and select your screen recording and share it.
Whatever your reason for needing to record your iPhone screen, these step-by-step instructions will make the process flawless and simple.
Tags: Apple, Apple iPhone, computer, Control Panel, instructions, iOS, microphone, phone, screen recording, settings, technology, tricks, updates
