5 Amazon default settings you must change now to increase your privacy

Amazon built an online shopping empire around this mission statement – “to be Earth’s most customer-centric company.”
From its humble beginnings as an online bookstore almost a quarter of a century ago to the current $763 billion mega-business, this mission appears to have served the company, and its millions of customers well.
But like any tech giant, big data is big business and Amazon has a myriad of ways of tracking you. From your shopping habits to consumer tastes, the company knows a lot about your habits.
If you’re a bit creeped out by this, here are five Amazon settings you can review to boost your privacy.
1. Remove your Amazon public profile
Did you know that Amazon automatically creates a public profile for you – whether you want it or not?
Your Amazon public profile lists your comments, ratings, public Wish Lists, any biographical information you’ve provided and other site interaction. Note: This profile does NOT include your purchases or your browsing history.
If you want to control what activity is visible on your public profile, put your cursor on the “Account & Lists,” button and then click on “Your Account.”
Scroll down to the “Ordering and shopping preferences” section. Click the “Profile” link, which is right above the social media preferences link.
Click on the link in the orange box to the right that says, “Edit your profile.” Click the Edit privacy settings tab.
It looks like this:

You can select or deselect items like Reviews, Questions, Who You Follow, Public Wish Lists, Baby Registry, and others. To simplify this, there’s also a handy option to “Hide all activity on your profile,” which turns everything off at once.
If you want a quick look at what information you’re sharing publicly, click “View your profile as a visitor.” You can tell at a glance if you’re sharing anything you don’t want to share.
If your profile is showing your real name, or other biographical information you don’t want, go back to the profile settings page and click the Edit profile tab, it’s located right next to the Edit privacy settings tab.
You can edit or delete any information like your Bio, Occupation, Location and more. You can even change the “public name” on your profile and post reviews anonymously.
2. Listen to and delete your Echo recordings
If you own an Amazon Echo, you probably know its strange secret. The device records a lot of what you say. On the upside, this amazing technology puts instant information a voice command away.
The downside is that Amazon stores an audio recording of every voice command you’ve issued to Alexa, not just in the device itself, but on Amazon’s servers.
Many people don’t realize you can actually review your voice log with the Alexa app on iOS and Android. The app allows you to scroll through your activity and listen to each recording.
It’s a bit tedious but it’s possible to go back and listen to the very first command you’ve ever uttered to Alexa. There’s nothing like hearing your two-year-younger self say “What’s the weather?”

To play an old entry, pull up the Alexa app and scroll down to the History section within Settings. Here, you can tap on the entry you’d like to review in greater detail and hit the Play icon to listen to the recording.

If the thought of having all your recorded requests stored in a database creeps you out, you need to delete each recording on the Alexa app. On the same History section, just select the entry then tap the big “DELETE VOICE RECORDINGS” button instead.

Note: If you want to delete all the recordings with a single click, visit the “Manage Your Content and Devices” page at www.amazon.com/mycd.
Keep in mind that Amazon warns, “deleting voice recordings may degrade your Alexa experience.”
3. Make your “Wish Lists” private
When you created your Amazon Shopping or Wish List, did you bother to check its privacy settings?
See, these lists are set to public by default and anyone can search for it using your name. Wish lists can be great for gift ideas but most of us use them for saving items that we want to view later.
If you’re not sure about the privacy settings of your Amazon Lists, click on the “Accounts & Lists” drop-down box then select “Shopping List” or “Wish List.”
Now on this “Your Lists” page, click on three dots (next to “Share List”) then select “Manage List.”

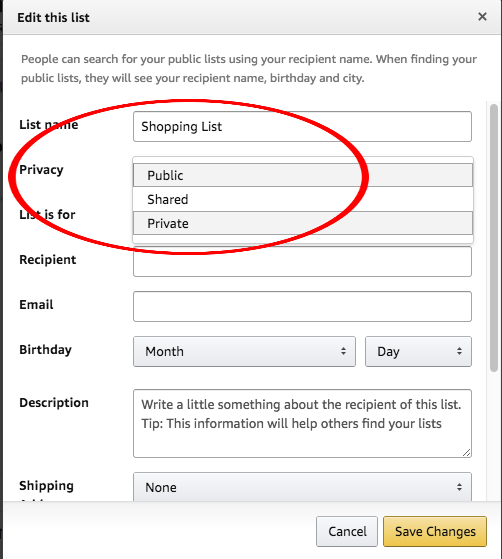
Here, you can change your list details like your list name, the name of the recipient, email, birthday and most of all, its privacy.
To change the list’s privacy, simply click on and select “Private” on the drop-down box.

4. Stop Amazon from tracking your browsing
Amazon also tracks all your browsing activity by default. It saves your searches, items you recently viewed and product categories you browsed for the sake of targeted ads. Although your browsing history is hidden from the public, you may feel a bit creeped out by it.
Here’s how to stop Amazon from tracking your browsing activity:
1. Log in to your account at Amazon.com
2. On the upper menu, click on “Your Browsing History.”

3. On the next page, click on the “Manage history” drop-down arrow.

4. Toggle “Turn Browsing History on/off” to Off

Note: You can also clear your entire browsing history here by clicking the “Remove all items” button
Here’s how to turn off personalized ads on your browser:
1. Go to “Your Account” page.
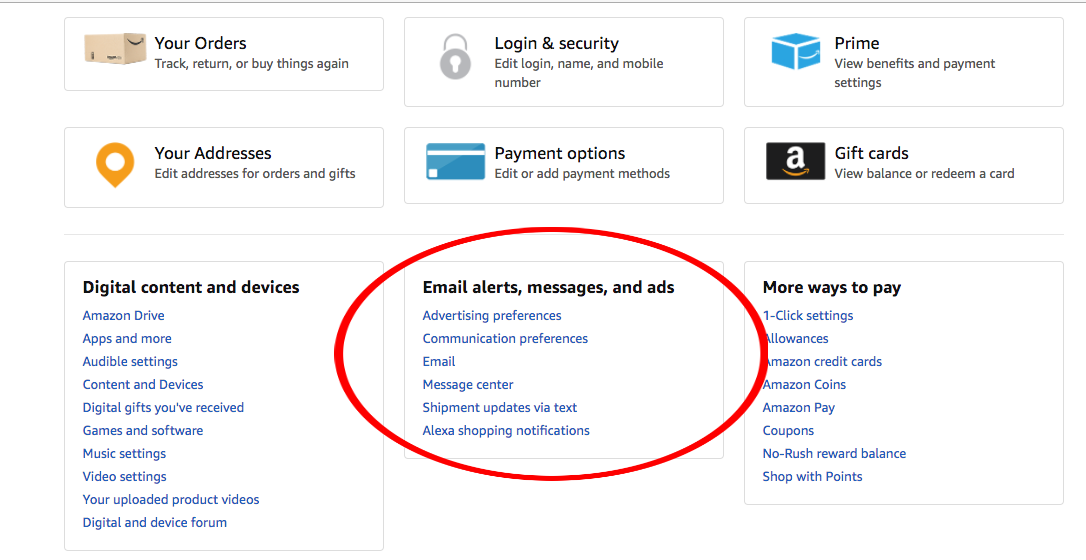
2. Under “Email alerts, messages, and ads,” click “Advertising preferences”

3, On this page, select “Do Not Personalize Ads from Amazon for this Internet Browser”
4. Hit “Submit”

5. Set a PIN on Alexa purchases
Voice purchasing on your Amazon Echo may sound like a convenient way to shop but it can be a potentially costly mistake.
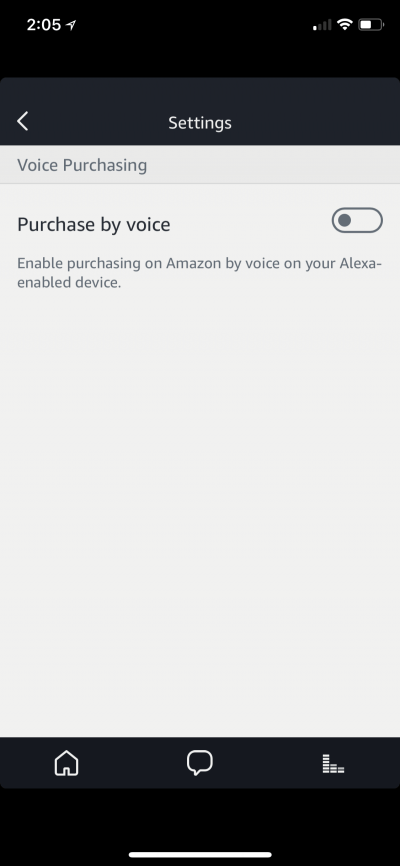
Personally, I’d just rather turn off my Echo’s Voice Purchasing option altogether and use Amazon’s app or website to shop. To turn it off, open your Alexa app, tap Settings then scroll down, tap Voice Purchasing and toggle “Purchase by voice” to Off.

If you still want the convenience (and the sci-fi vibe) of Echo voice purchasing, you should set up a PIN code to avoid unauthorized purchases.
To set it up, go to the same Voice Purchasing settings page on your Alexa app, toggle “Purchase by voice” to On then toggle “Voice code” to On as well. This will prompt you to enter your 4-digit PIN code.

Once you have a Voice Code configured, the 4-digit code has to be spoken out to complete a purchase on your Echo.
Of course, anyone can simply listen in and reuse your code so having a Voice purchasing PIN is not fool-proof and brings in a whole set of security problems too. Like I said, I’d rather have Voice Purchasing set to off completely.
We may receive a commission when you buy through our links, but our reporting and recommendations are always independent and objective.
