Small biz tip: How to set up an authenticator to protect your work accounts
Your business accounts have tons of private data you don’t want hackers to see. Although two-step verification (2FA) keeps hackers out, you can’t rely on texts to prove your identity. Hackers can intercept your messages.
Want to take security a step further? Use authenticator apps to secure your business. They create unique, time-sensitive codes you can immediately use to verify who you are and protect your accounts.
Apps like Microsoft Authenticator and Google Authenticator are more secure than 2FA texts. They’re free and highly effective against hackers. Use this guide to set up each tool on your iPhone or Android phone.
Here’s why you should use an authenticator app
Every 30 seconds, an authenticator app generates a one-time passcode you can use to sign in. But be quick. The code will expire in half a minute. Compare that to a text code, which gives hackers an extended time window to break into your account.
Plus, you don’t have to enter a phone number to set up an authenticator app. It’s unique to your device.
When you log into an account using 2FA with an authenticator app instead of a text, a unique code will be generated on the app. This is more secure than a text because the code can’t be intercepted. Tap or click for our guide to authenticator apps.
Which is better: Microsoft Authenticator vs. Google Authenticator? It all depends on what you’re looking for.
How to set up Microsoft Authenticator on an iPhone or Android
If you’re comfortable with Windows and Microsoft products, you may prefer this app. It secures Chrome, Gmail, GitHub, YouTube and other important accounts. As a bonus, it has a built-in password manager, which helps you access your accounts with one tap.
First, download the free app for your phone. It’s available for iOS and Android.
To set it up, connect your Microsoft account to the app. On your computer, log in to Microsoft.com, click on your profile and select My Microsoft Account.
Scroll down to Security > Security dashboard > Advanced security options.
On the new page, select Add a new way to sign in or verify.
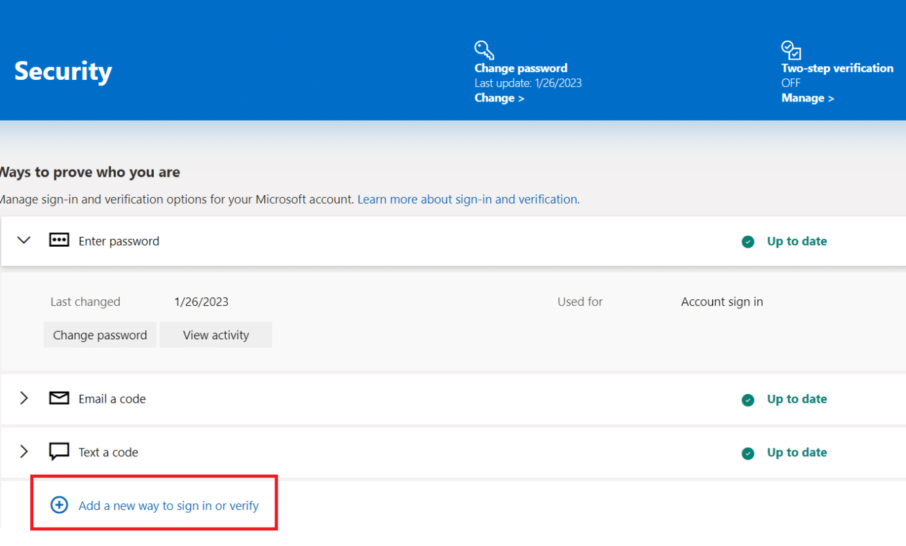
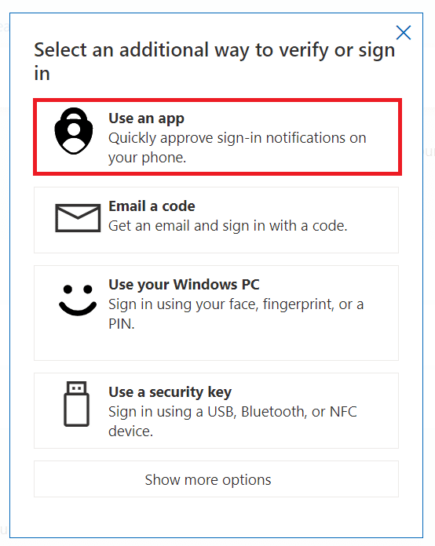
There are three options underneath Select an additional way to verify or sign in. Select Use an app.
Next, Microsoft prompts you to set up the authenticator app.
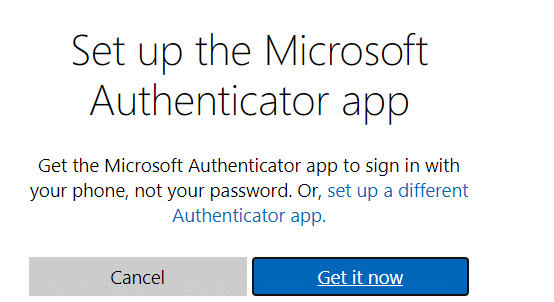
Select Get It Now > Next. Then, you’ll see a QR code.
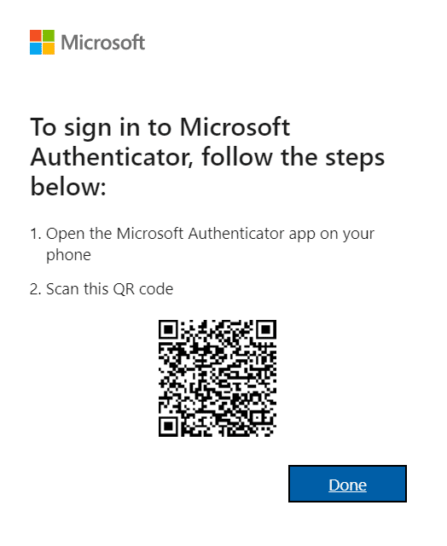
Now it’s time to set up your authenticator app.
RELATED: How to scan a QR code with your iPhone or Android phone
Follow these steps to fully connect your accounts
Open Microsoft Authenticator and select Add account.
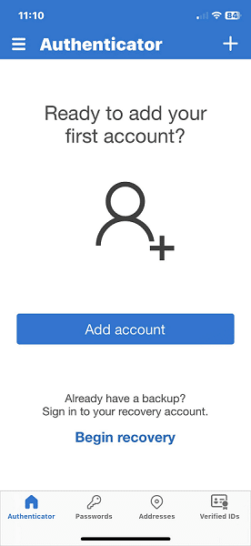
Here you can select your account type. For this purpose, choose Personal account. Then, select Scan QR code.
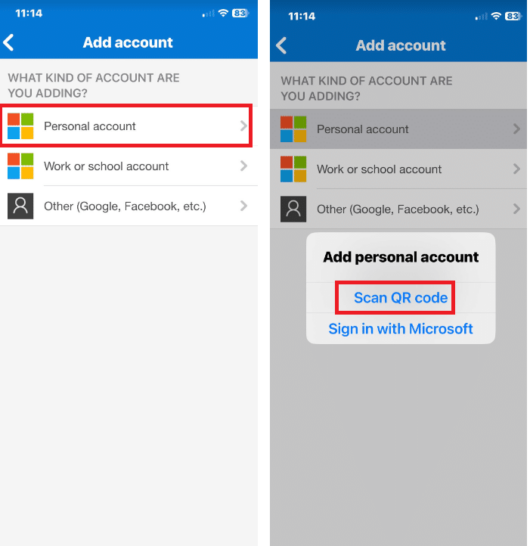
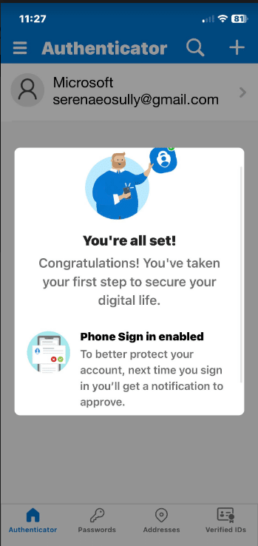
Using your phone camera, scan the QR code. Then, enter your phone’s passcode and you’re done. Once you get this pop-up, the connection is confirmed.
How to add multiple accounts to Microsoft Authenticator
To start, open the app and select the plus sign + in the top-right corner. Select the type of account you want to add. The next steps you must take will vary depending on the account type.
Need more specifics? Microsoft has a guide to connect Authenticator to your Facebook, Google, GitHub and Amazon account. Check it out here.
How to set up Google Authenticator on an iPhone or Android
Maybe you’re more comfortable with Google’s UI design. Google Authenticator is simple and easy to use, though it lacks some security features. You can’t lock the software, so a person who unlocks your phone can see your codes.
Note that Google Authenticator doesn’t back up your account codes online, so you’ll be in trouble if you lose your phone.
Google Authenticator takes just a few minutes to set up, and you can use it with your Microsoft accounts.
First, download the free app for your phone. It’s available for iOS and Android.
Then, go to your Google Account on your iPhone or Android. The following steps will depend on your phone type.
Set up Google Authenticator on your iPhone
- Go to your Google Account.
- Tap Security > 2-Step Verification. NOTE: You may have to sign in.
- Go to Add more second steps to verify it’s you.
- Under the Authenticator app heading, select Set up authenticator.
- Then, follow the on-screen steps.
Set up Google Authenticator on your Android
- Go to your Google Account on your smartphone.
- Tap Security. (Can’t find it? Swipe through the tabs.)
- Go to Signing in to Google and tap 2-Step Verification. You may have to sign in.
- Go to the Authenticator app and select Set up. (You may see Get Started instead.)
- Follow the on-screen steps.
Now you can connect more work accounts to Google Authenticator. Select the plus sign + in the lower right corner to add an account to the authenticator. Then select Scan a QR code or Enter a setup key.
Within the account you want to connect, look for two-factor verification options. The exact steps will depend on the account you wish to secure, but look for words like “authentication apps” to get started.
Authenticator apps aren’t the only way to protect your business
If you want your business to succeed, you’ll have to beef up your cybersecurity strategies. While you’re at it, revisit your software setup. Are you setting yourself up for failure with outdated management programs that hinder your visibility? Our sponsor, NetSuite by Oracle, is your solution.
Netsuite empowers you to control your financials, inventory, HR, planning, budgeting and more. You can automate your processes, close your books in no time and stay far ahead of your competition. Around 93% of surveyed businesses increased their visibility and control after upgrading to NetSuite.
Over 32,000 businesses already use NetSuite. Head to NetSuite.com/KIM for this special, one-of-a-kind financing offer on the No. 1 financial system for growing businesses.
Tags: accounts, Android, Apple iPhone, authenticator apps, cybersecurity, Google, Google Authenticator, hackers, Microsoft Authenticator, NetSuite, password managers, private data, security, Two-step verification

