Design your dream home in 3D (for free)
June 26, 2019
By Kim Komando
Do you ever watch HGTV and drool over the 3D models the designers are able to render of their ideas? Perhaps you wish you could make something like that for your own home redesign, or just for a bit of fun when you get an idea for a cool room.Homestyler is a site where you can make these sorts of models right on your web browser — and it lets you make them for free. Design a room, an apartment, or an entire house by accessing a catalog of real furniture and construction pieces, and share your floor plans and 3D models with other design-loving users, or keep them private for just your use.Homestyler is a bit tricky to navigate, but if you’re passionate about home décor and interior design, you can have quite a bit of fun with it. Below, we’ve detailed our favorite parts about the site and some drawbacks we found. Read on to see if Homestyler is something you’d like to use, and if it is, scroll to the end of the article and click the blue button.
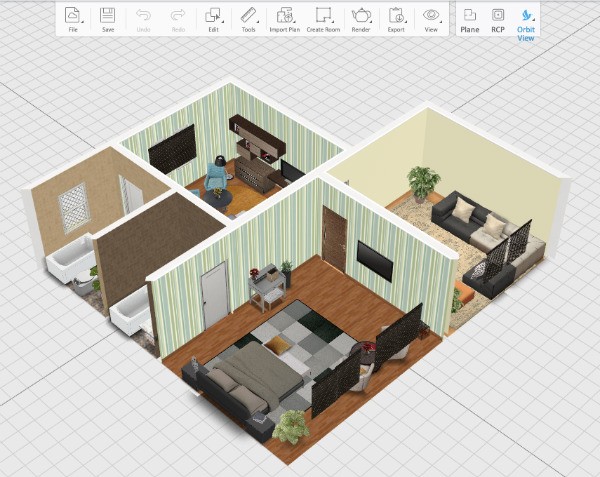
 And here is what the same rendering looks like in the app’s “orbit view”:
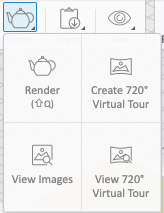
 Once you’ve designed a custom room or played around with the fun templates and designs, it’s incredibly simple to share your design with other Homestyler users. Just click “Save,” and have your design set to “Public.” Once you name your design and type up a description for it (which can be as long or short as you want, but must exist in order to be publically available), it will be available for view in the Gallery on the site, and the Design Stream that plays.You can see how many people have looked at your room designs on your profile page, how many comments are on them, and how many people add them to their favorites. It’s a fun way to socialize about design and share something creative you’ve made. Just remember, you’re more likely to be shown in gallery streams with multiple photos taken of your space, and with at least on Panorama or Virtual Tour modes.Just click on the “Render” tea kettle icon in the design space toolbar, then “Render” again to take pictures of your design, and select “Panorama” or “Virtual Tour” in the “Render” menu to make those.
 Rendering the panoramas and tours can take a little while, but it’s because Homestyler is creating the best view of the entire space you’ve made, adding cool backgrounds to your windows, and making reflections in mirrors work. In other words, not only can you design cool rooms in Homestyler, you can get great views of them made without needing to manipulate a camera or know how to use screen-capture software. Homestyler does that for you and makes it easy to share those things right on the site, where you can link friends and family to it, as well as interact with other users.You can also save projects privately, and work on them or duplicate them as much as you want before sharing them publically. And you can import images or designs you have elsewhere, so long as the files are JPG, PNG, or DWG files (DWG is an extension for 2- and 3-D design files and is most often seen from the program AutoCAD).In general, Homestyler lets you make attractive designs and helps you show them off in even more attractive ways. On top of that, it adds a fun social aspect, letting you see other designs and get inspired for your own. It’s really a very fun site—with just a few drawbacks, which we’ll get to next.
How the 3D home design tool works
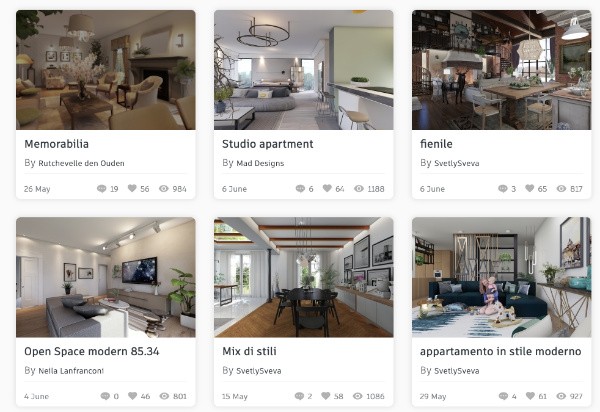
Homestyler does require you to create an account.Select “Create an Account,” and provide your name and email. No need to verify your account — you can get right to designing. Yes, providing your email and creating an account means data is being collected on you while you use the site. The site asks if you want to sign up for their email newsletter, which is another way they directly market to you. You can always opt out. Related: Check out these DIY projects for your home. What you can also enjoy are the amazing renderings that can be made on Homestyler. A quick glance through the gallery of user-created spaces shows not only the talent of people who use the site, but also the capabilities of the platform. The spaces created can look like photographs rather than drawn works, and the two-dimensional floor plans look like plans you might get from an architecture firm. And yet, you can make them yourself, for free, right on your web browser.
How to toggle between views of Homestyler
Switching between views of these plans, and of the 3D space you’re creating, is incredibly easy within the design space. The 3D view can be viewed in a small window at all times as you build in the “Plane” view (the flat floor plan view), or it can be minimized. You can also switch to a full 3D view by selecting the “3D” option from the right-most part of the toolbar, and design within that space, or in an “Orbit” view that creates a 3D diorama view for you. Switching between views is incredibly easy thanks to the buttons on the toolbar, and it’s easy to click and drag to move your view around within the space as well, meaning you can always see what you need to see while you’re designing, and see if from a variety of perspectives at once if you need to. Related: Thinking of selling your home? These tools help you find out your home’s worth. This is what your rendering might look like in flat view. And here is what the same rendering looks like in the app’s “orbit view”:
 Once you’ve designed a custom room or played around with the fun templates and designs, it’s incredibly simple to share your design with other Homestyler users. Just click “Save,” and have your design set to “Public.” Once you name your design and type up a description for it (which can be as long or short as you want, but must exist in order to be publically available), it will be available for view in the Gallery on the site, and the Design Stream that plays.You can see how many people have looked at your room designs on your profile page, how many comments are on them, and how many people add them to their favorites. It’s a fun way to socialize about design and share something creative you’ve made. Just remember, you’re more likely to be shown in gallery streams with multiple photos taken of your space, and with at least on Panorama or Virtual Tour modes.Just click on the “Render” tea kettle icon in the design space toolbar, then “Render” again to take pictures of your design, and select “Panorama” or “Virtual Tour” in the “Render” menu to make those.
 Rendering the panoramas and tours can take a little while, but it’s because Homestyler is creating the best view of the entire space you’ve made, adding cool backgrounds to your windows, and making reflections in mirrors work. In other words, not only can you design cool rooms in Homestyler, you can get great views of them made without needing to manipulate a camera or know how to use screen-capture software. Homestyler does that for you and makes it easy to share those things right on the site, where you can link friends and family to it, as well as interact with other users.You can also save projects privately, and work on them or duplicate them as much as you want before sharing them publically. And you can import images or designs you have elsewhere, so long as the files are JPG, PNG, or DWG files (DWG is an extension for 2- and 3-D design files and is most often seen from the program AutoCAD).In general, Homestyler lets you make attractive designs and helps you show them off in even more attractive ways. On top of that, it adds a fun social aspect, letting you see other designs and get inspired for your own. It’s really a very fun site—with just a few drawbacks, which we’ll get to next.
What isn’t great about Homestyler
The worst thing about Homestyler is that when you first start using it, it’s confusing.Menu items aren’t intuitive: There are a lot of options right from the beginning, and the controls aren’t always intuitive. For example, you may find the “Create Room” button fairly quickly, which you need to hit to start designing, but you may not understand what the menu items “By Center” or “By Edge” mean.You can’t click and drag: Creating rooms isn’t a click-and-drag situation, as you might expect. Instead, you click at a starting point, click on an ending point and form walls and structures that way. Once you’re done making a room, you’ll find you stay in the “Create Room” mode, so you’ll keep making walls when you click in the design until you right click and hit “Cancel” or until you switch to 3D view, and then back to Plane. We only found this after many unsuccessful attempts to get out of the “Create Room” mode.Hotkeys can be wonky: Hotkeys are a little strange until you get used to them. When placing windows, we wanted to use the same window type on all the walls, without having to find that window over and over in the catalog. Copying and pasting a window with Ctrl+C and Ctrl+ V didn’t work. Eventually, we found a Duplicate option, accessible by Ctrl+D, or Cmd+D on a Mac.This is Homestyler’s main problem — all of the functions you want for the program are there, they’re just not always easy to find.To fully understand Homestyler and its potential, you just have to use it a lot. Don’t be afraid to click around and see what happens, and don’t be afraid to be a little bad at using the system for a while. Watch their short tutorial videos and check out the FAQ if you get stuck.https://www.komando.com/tips/software-and-apps/design-your-dream-home-in-3d-with-homestyler/